
How to Apply Sheet Rock Mud Without Sanding
I hung all my sheet rock by myself even with 9-foot ceilings. To achieve this I built my own sheet rock lift so I could work by myself. This link will play 2 videos one after the other showing my simple yet effective lift unit.This page is different from others because it recommends some YouTube videos. They are the best ones I found on this topic, but they have some flaws that I will explain below. Please read this page first before watching these third party videos! Here is our video showing my finished house walls. These videos will help with building your own home.
I had the privilege of working with a highly skilled drywall finisher who generously shared his expertise with me. His craftsmanship in finishing drywall is truly exceptional. He kindly agreed to answer my questions and provide insights into the art of drywall finishing.
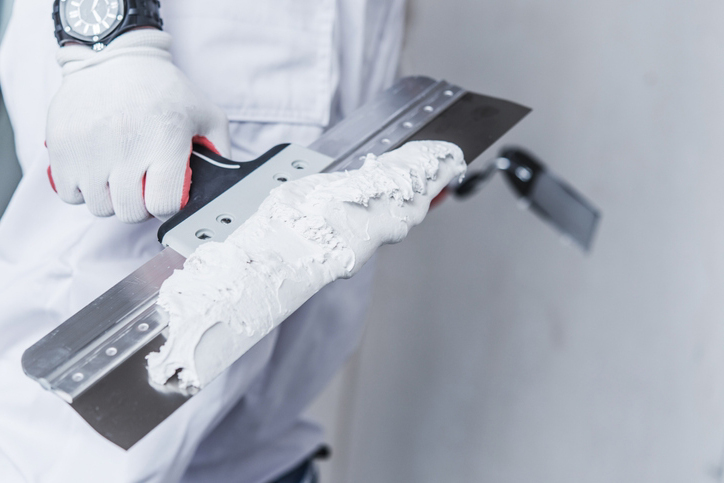
Incredibly, he completed the finishing for my 2-1/2 bath, 3-bedroom house within just one weekend. He began on a Friday evening, continued through Saturday, and dedicated a bit of time on Sunday morning to complete the job. What’s truly remarkable is that he accomplished this without the need for sanding, showcasing his mastery of the drywall knife (often mislabeled as a trowel by amateurs who may not fully grasp its proper use).
His technique involved applying four thin layers of mud at each joint, resulting in a flawlessly smooth finish. The initial layer served the purpose of securing the tape. The second layer covered the top third of the tape, while the third layer concealed the bottom third. Finally, the fourth layer covered the entire tape once more. He allowed the mud to dry between each layer, which was remarkably quick due to the thin application.
The videos don’t show how to clean the bucket after each day’s work. This is important because any mud on the sides of the bucket will harden overnight and fall into the mix the next day. You have to wipe all the mud from the sides with a damp cloth until you reach the surface of the remaining mud. Then you put plastic wrap on top of the mud and tuck in the edges to prevent the top layer from drying out. You can just place the lid on top, no need to seal it.
The next day, you can easily open the bucket and remove the plastic wrap. The mud will be ready to use without any chunks that would ruin your thin layers. This simple step will save you a lot of trouble.
Use Less Mud While Building Your Own Home
The next thing missing in these videos is that they are using way too much mud. Thick mud is your enemy. The more mud you pile onto that seam, the higher that seam becomes and the more mud it takes to hide the transition. And, guess what, the thicker the mud the longer it takes it to dry. Thin passes will dry within a short time whereas thick mud will take all night to dry. Thick mud also tends to crack while drying.
Stop trying to make each pass look good. Instead focus on using as little mud as possible. That’s right, let the tape show through initially it doesn’t matter. Let those slight raised edges of mud at the ends of the knife remain on the wall. These edges are greatly reduced by how you place the mud on the knife. The below mentioned videos address this mud placement on the knife.
Each time you back up and repeat a pass you are wasting time and the new pass usually has more defects than the first pass. Don’t worry about these small defects which are easily cut off later using the knife edge. Thin mud dries very fast. Thick mud takes forever to dry. Once the mud is dry, just glide the knife edge over those slight raised edges and watch them disappear like magic. this is because those raised edges were small and they flake right off with the knife edge.
Knife Flexing
Pay particular attention when the videos mention flexing of the knife. This produces dramatic results with very thin mud application. The professional that did my house, used a tape dispenser along with matt tape. He also didn’t pre-measure the tape length. Instead, he simply started at one point, mudding the tape in place, and when he reached the other end, he would clamp the tape with the knife edge and tear it off. He also used one of those hand held rectangular buckets to carry the mud. Remember, the thinner the mud, the less mud you have to carry and that equates to less shoulder fatigue from holding the bucket. The bucket is very important because you are constantly scrapping the mud off your knife and re-applying the mud to the knife in the proper manner and location for the next pass.
Video 1 : 9-minute video covers most aspects in general, results in too much mud being applied. Good demonstration of how to test screw head height issues. good overall except for the items mentioned above.
Video 2 : 13-minute video doing butt joints. Once again using too much mud. The first few passes don’t have to look good, just keep as thin as possible. This is another case for the four thin passes mentioned above. Thick mud = sanding required. Thin mud also dries much faster. Once dry, use your knife edge to remove any edges showing before applying the next layer. This will eliminate any sanding by keeping the mud thickness to a minimum.
Video 3 : 7-minute video on doing inside corners (bend the knife). Once again, use your knife edge to remove any edges (perpendicular to the corner) before applying the next layer. Never try to do both corner edges at the same time. DO one side and let it dry before doing the other side. This will reduce the possibility of the knife corner edge penetrating the mud on the facing wall.
Video 4 : 8-minute video on Outside corners, how to install corner-bead (paper-faced). Once again wipe the mud as thin as possible on each pass.
This “Sheet Rock Mud Guide v1” PDF is offered separately so as to be available to all builders, regardless of building materials. This will help you with building your own home.