
Qcad v3 Printing Considerations
Narrow-Carriage Printer
If you just have a narrow-carriage (8-1/2″ wide paper) printer then you have the following options. Using legal paper and portrait printing orientation, you can tape two pages together and have a drawing size of 14×17 inches, or tape three pages together to obtain 14×25.5 inch drawing size. Here is an example 8-minute printing video.
So how do you print the separate page tiles of the drawing? It turns out that you don’t need tiling software, you just need a little ingenuity (poor man’s tiling). I wasted a couple of days searching for tiling software and never found a low-cost utility solution. So then I returned to QCad and started experimenting. You will notice in QCad print-preview that you can drag the paper around underneath the drawing preview. All you have to do is draw some dotted lines as cutting lines on the drawing, then drag the paper into position and print. Now drag the paper to the next position and print again. After all the page tiles have been printed, just use the cutting lines as guides to trim and tape the drawings together. You can also place a dotted line just ouside the drawing and horizontal to the drawing border box. This line would be used for vertical paper alignment for each QCad tile print paper positioning.
Lazer printers give such high definition when in the 300 or 600 dpi mode, that you can print an 11″x17″ drawing on an 8-1/2″x11″ letter size page by using the “shrink-to-fit” option. The drawing text size can be as small as 4-inches in height and remain legible with the naked eye (of course a magnifying glass improves the ease of reading). You can also “shrink-to-fit” a 13×19 drawing size, but the magnifying glass will most likely be mandatory. An inkjet printer on the other hand when using shrink-to-fit as described above, will need 5-inch text height for comfortable viewing.
Wide-Carriage Printer
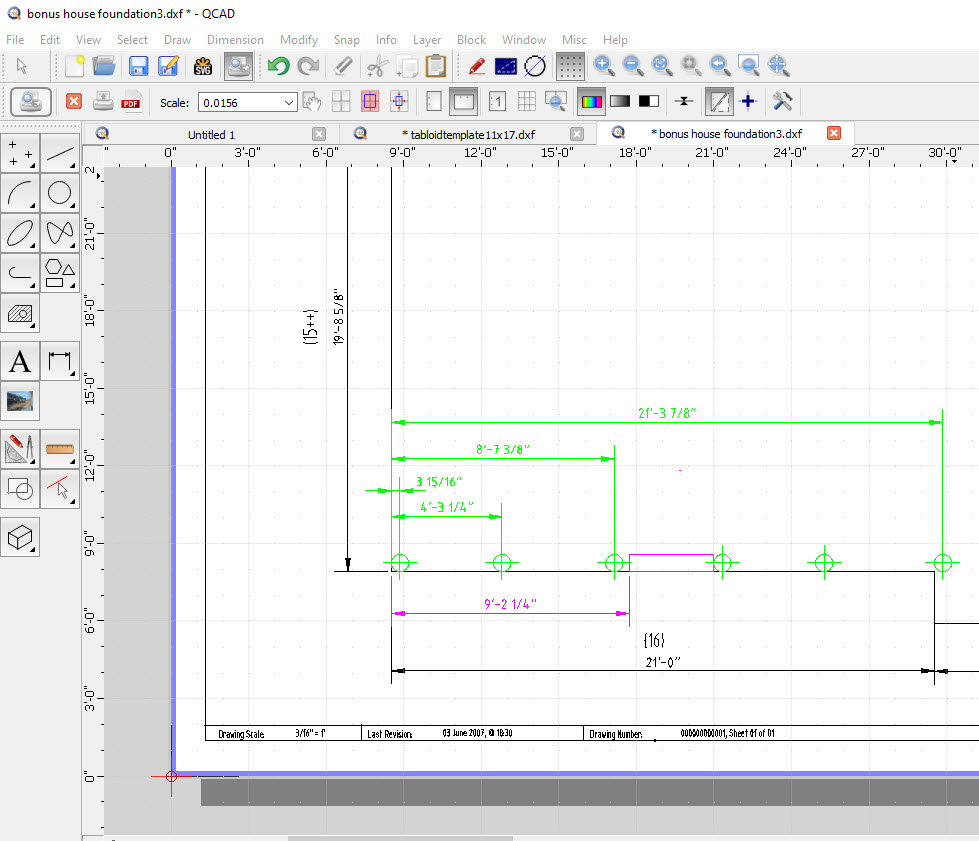
If you have a wide-carriage printer, then you should special order 13″x19″ paper for the optimum drawing size. This is often referred to as SuperA3/B paper. I have found the lowest price for Paper 13×19″ – 50 Sheets, $59 (price may vary over time) at www.bhphotovideo.com. Yes it is expensive, but it gives you that extra drawing space that comes in handy. You can always use cheaper 11″x17″ paper if you don’t need the additional drawing area. The 11×17 paper sells for about $13.00 per 500 sheets and can usually be found locally. As stated in the eBook, both 11×17 and 13×19 paper sizes should use a scale factor of 0.015625 for 3/16″=1′. With a wide-carriage printer you would simply print from QCad using (Tabloid) 11×17) or (Custom) 13×19 paper selection. We also recommend placing a scale bar on the drawing. The scale bar will have tick marks for various dimensions. The scale bar will change if the paper scaling changes and is far superior to text scale statements since the scale bar retains its accuracy when the printout scale changes either on purpose or by accident. Here is an example 11-minute advanced printing video related specifically to house plan drawings.
You can also go large and tile multiple pages in portrait mode to get 17×22 or 19×26 drawing sizes. In reality the drawing area should be reduced to 15.5×20.5 and 17.5×24.5 to ensure printouts that overlap enough for proper taping. In this case, you may want to consider changing the drawing scale factor to 0.020833 (1/4″=1′). I myself would leave the scale factor at 0.015625 (3/16″=1′) because that is more than adequate and affords much more drawing space on the printout. So how do you print the separate page tiles of the drawing? It turns out that you don’t need tiling software, you just need a little ingenuity (poor man’s tiling). I wasted a couple of days searching for tiling software and never found a low-cost utility solution. So then I returned to QCad and started experimenting. You will notice in QCad print-preview that you can drag the paper around underneath the drawing preview. All you have to do is draw some dotted lines as cutting lines on the drawing, then drag the paper into position and print. Now drag the paper to the next position and print again. After all the page tiles have been printed, just use the cutting lines as guides to trim and tape the drawings together. You can also place a dotted line just outside the drawing and horizontal to the drawing border box. This line would be used for accurate vertical paper alignment registration for each tile print paper positioning action in QCad.
Adobe Acrobat Page Tiling
Be warned that I have found that my version of QCad generates faulty PDF export files when custom paper size is selected. This limits your maximum drawing size when printing from PDF export files to the largest listed page size in QCad which is Tabloid (11×17 inches). The “poor man’s tiling” procedures described above will permit larger drawing sizes. If you have Adobe Acrobat (not Adobe Reader) with tiling capability, or another method of tiling large pages on smaller page printers, then you have many more options. If any of you know of a good tiling application that is low-cost or free and tiles as well as Adobe Acrobat does, please let me know and I will add it here. Just export your drawing to a PDF file then use Adobe Acrobat to print that PDF file. During the Adobe Acrobat print dialog, under the “page scale” option, select the <tile all pages> choice. Then set “tile scale” to 100% and set “overlap” to zero. Set “cut marks” to <Western Style>, uncheck the “labels” checkbox, and select “print color as black” checkbox if you have a monochrome printer. You may have to adjust some “printer properties” until this print dialog box shows the “print preview” area the way you want it to look. Now just click “OK” and the print job will proceed. Cut the paper as required on the “cut marks” and tape the sheets together.
Recommended Drawing Changes
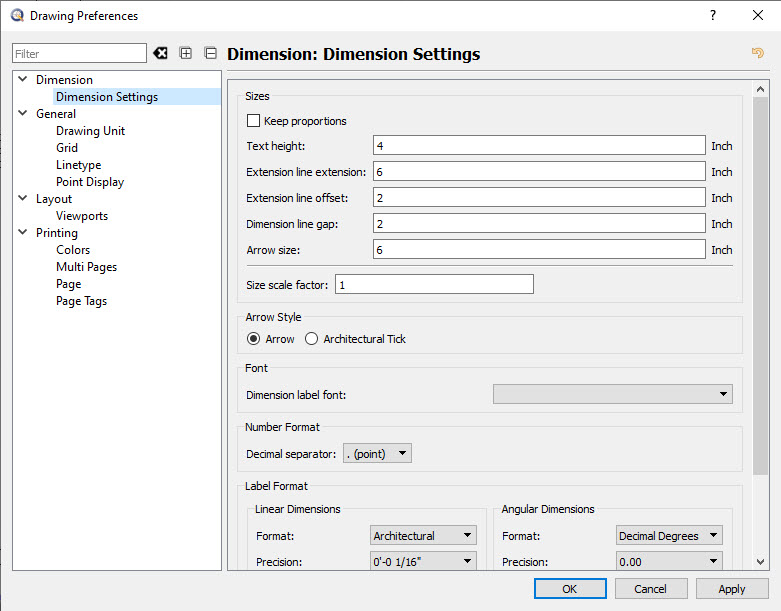
In closing, we offer the following changes to the Current Drawing Preferences within QCad for most home size drawings as shown in the below image:
- Inch – Architectual – 0′-0 1/16″
- Dimension – text height – 4 or 5-inches
- Dimension – ext line – 4-inches
- Dimension – offset – 2-inches
- Dimension – line gap – 2-inches
- Dimension – arrow size – 6-inches
We also recommend that you set all default layer line widths to 0.20mm, and leave your printer in its high resolution mode. This will result in pleasing line widths that are good for 8-1/2×11; 11×17; and 13×19 inch paper. This 0.20mm line width also appears to work quite well with 17×22 and 19×26 inch tiled pages. Remember, if you have a monochrome printer, the printer will dither lines to make them represent different colors. This is not good because the dithered text is very difficult to read. We recommend that you use the QCad print preview “wht/blk mode” button before printing to eliminate dithered color simulation. This way you can keep colors for differing drawing layers in QCad views, yet the printed page will not be dithered.
As mentioned earlier, we now recommend placing a scale bar on the drawing. The scale bar will have tick marks for various dimensions. The scale bar will change if the paper scale changes and is far superior to text scale statements since the scale bar retains its accuracy when the printout scale changes either on purpose or by accident.