
Dry Stacked Construction Handbook update
Update (03/18/25) Room dimensions with regard to sheet rock fastening
With regards to planning the floor plan, you should also consider sheet rock lengths and widths. For example, a wall for a room that is 17-feet long would be terrible. To sheet that wall you would need two sheet rock sheets laid on their sides (16-feet) or (4 sheets vertical = 16-feet) with one foot left over. Instead a 15-foot wall would be better because you can cut some off of the second horizontal sheet to make it fit. For proper room dimensions, the wall length, if longer than sheet rock widths on the wall length, then that wall length should be stretched to the next wall stud so that short piece can be fastened to a stud on both sides. The block wall growth and this sheet rock issue are two separate issues and both should be considered when establishing room dimensions.
Update (03/20/24) Wall dimensions update and roof trusses added
We have rewritten portions of the “Dry-stacked wall dimensions” chapter to improve clarity. We have also added new information related to the dry-stacked home roof trusses and roof sheathing considerations.
Pouring the Bond Beam (1/24/14)
Chapter 15 of the Book addresses some details of the lintel concrete blocks and the bond beam in general. However this chapter does not specifically address truss tie-down strap placement within the bond beam. These tie-down straps must be properly placed and inserted during the bond beam pouring process. This addendum to Chapter 15 will provide additional information concerning tie-down straps and how I did it. Your choices may be different and must be determined by you and/or your professional consultant.
Most dry stacked block house construction uses trusses as the roof structure. These trusses are normally engineered and built by a company that specializes in trusses. You provide your foundation and wall plans to them and they design and build your required trusses. After the trusses are designed and accepted, a copy of the truss plans are provided before the actual trusses are built. You will need your truss plans to mark where the tie-down straps are placed within the bond beam before the bond beam is poured.
To transpose your truss plan tie-down strap locations onto the wall, use a convention such as the mark will always be on the clockwise side of the truss all around the bond beam when using the outside edge of the truss width to place the truss mark. Then when you place the truss upon the wall you will know upon which side of the tie-down strap to place the truss (the counter-clockwise side in this example). You can also place an “X” on the side of the mark where the truss sits.
In my design, I had two rebar in the bond beam. I installed the tie-down straps in place at the marked locations and then wire-tied each strap to the bond beam rebar. While pouring the bond beam, ensure that the straps are mostly vertical and not leaning.
Update (03/10/10) Using a jig for square window/door openings
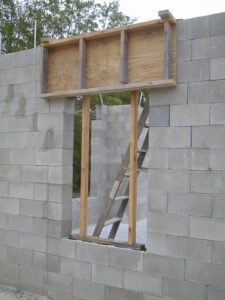
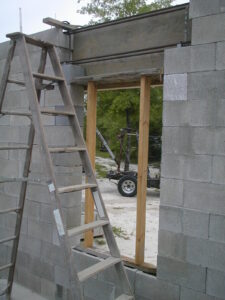
This text provides additional information to help you build square window/door openings for your project. As explained in Chapter 14 of the Book, you want the window tops to be close to the door height for aesthetic reasons. See the pictures below for the header and sill locations.
To achieve square openings, we recommend that you build a jig that matches the exact dimensions of the window/door opening, including any framing material attached to the blocks. The jig should be made of 2×4 boards and a plywood panel with lift holes. Once again, the dimensions should also account for any wood framing between the window and the blocks.
The best sequence for pouring the window sill and header is as follows:
- Stack the wall rows until you reach the row that will have the window sill (row three for 3’x5′ windows in our example)
- Place the jig at the correct location on that row and shim it so it is level and plumb. Brace the jig to the ground.
- Stack the blocks against the jig, making sure not to move it horizontally.
- Use the closing blocks for each row to adjust for any variance in the opening.
- DO NOT use the blocks next to the window as closing blocks. The closing block should be mid-way on each wall section.
- Remember that one side of each window/door row will need a half block.
- For a door opening, place the door jig on the floor between the opening blocks before stacking them.
This additional information is provided to make your building experience more successful. As described in Chapter 14 in the Book, you want the window tops to be nearly the same height as the door height for aesthetic reasons. Notice the header and window sill locations in the pictures below. This new section will help you to get square window/door wall openings and also recommends a specific sequence for pouring the window sill and window header.
The two pictures below demonstrate how I did it. I now recommend that you pour the window sill first. After the window sill has set overnight, then use the props and top board thickness to set the height of the bottom of the window header as shown in the second picture. This will result in exact window height opening.
Installed concrete block dimensions (7/24/10)
Although this is not an error, we reference it here to reduce possible confusion. In the “Dry stacked Wall Dimensions Chapter”, we point out that the corner- block is 8.0625-inches wide. We also point out that the installed half-block linear length is about 7.9-inches and the installed full-block length is about 15.7-inches. These estimates were provided as guidelines for planning walls. These estimates do not consider wall growth, but instead are the real installed block lengths including 1/16″ gap to compensate for slight misalignment.
Later in the same Chapter, we discuss wall growth in greater detail and next we describe the spreadsheet solution. The spreadsheet solution eliminates the estimates described in the previous paragraph of this text. The spreadsheet concrete block unit length is defined as 15-6/8″ which equals 15.75″. This dimension precisely includes wall growth and installed length. A linear half-block is defined as 15.75″/2 = 7.875″. The difference between a linear half-block length (7.875″) and a corner block width (8.0625″) is rounded off to (0.25″) when in reality, this difference is (0.1875″) which is actually (3/16″). This add-on for a corner-block was rounded up to (0.25″) simply for the ease of doing the math during manual dry stacked wall dimension considerations. This slight excess doesn’t hurt and it also ensures that short two-block out-crops will not have a problem.
Truss tie-down considerations
Your local building code will specify the size of tie-downs required. Consult with your local building inspector. Most tie-down straps have a mark which indicates how deep the tie-down must be inserted into the concrete bond beam. Be sure to use metal strap nails when fastening the truss to the tie-down straps because improper nails will fail inspection.